
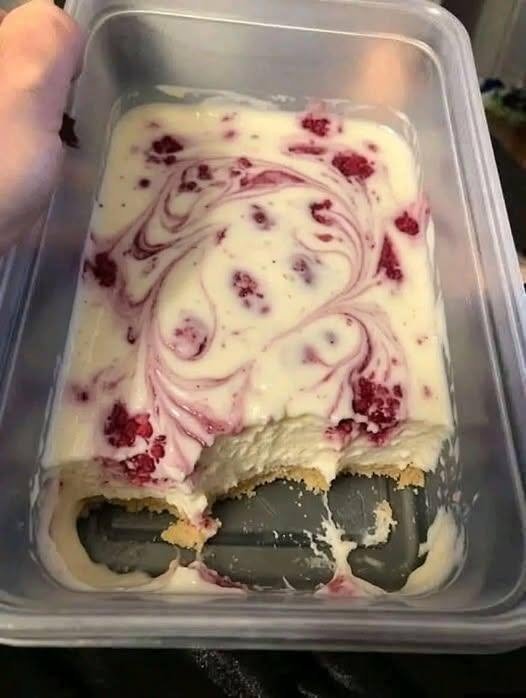
Raspberry Swirl Protein Cheesecake — Full Detailed Recipe
A rich, creamy vanilla cheesecake with a buttery biscuit crust, a smooth high-protein filling, and beautiful ribbons of sweet and tangy raspberry sauce. This homemade cheesecake is perfect for dessert, a special occasion, or a protein-rich sweet treat.
This recipe includes detailed ingredient measurements, preparation instructions, baking tips, troubleshooting, storage, and estimated nutrition. Text only, without pictures.
1. Recipe overview
-
Preparation time: 25–35 minutes
-
Baking time: 45–60 minutes
-
Cooling time: Approximately 1 hour
-
Refrigeration time: 6–8 hours, preferably overnight
-
Total time: Approximately 8–10 hours, including chilling
-
Yield: 8 slices
-
Pan size: 7-inch (18 cm) springform pan
-
Oven temperature: 160°C (320°F)
-
Difficulty: Moderate
2. Ingredients
A. For the biscuit crust
-
100 g digestive biscuits or graham crackers
-
35 g unsalted butter, melted
-
1 teaspoon honey, optional
-
A small pinch of salt, optional
Purpose of the crust: The biscuits provide a slightly crunchy, buttery base that balances the soft cheesecake filling. Honey is optional and adds a subtle sweetness.
B. For the protein cheesecake filling
-
450 g full-fat cream cheese, softened to room temperature
-
250 g thick Greek yogurt
-
2 large eggs, at room temperature
-
60 g vanilla whey protein powder, approximately 2 scoops depending on the brand
-
80 g granulated sugar
-
1 teaspoon vanilla extract
-
1 tablespoon cornstarch
-
1 tablespoon fresh lemon juice
-
1 teaspoon finely grated lemon zest, optional
Ingredient notes:
-
Cream cheese: Full-fat cream cheese generally produces a smoother and richer texture. Reduced-fat varieties can work but may produce a slightly less creamy result.
-
Greek yogurt: Use thick, strained yogurt rather than regular runny yogurt. Excess moisture can prevent the cheesecake from setting properly.
-
Protein powder: Vanilla whey protein is a convenient choice. Whey-casein blends can also work. Plant-based powders may absorb more moisture and produce a denser texture.
-
Sugar: The amount can be adjusted slightly to taste, but removing too much sugar can affect the final texture.
-
Cornstarch: Helps stabilize the filling and reduces the risk of a watery texture or cracking.
C. For the raspberry swirl
-
150 g fresh or frozen raspberries
-
1–2 tablespoons granulated sugar, according to taste
-
1 teaspoon lemon juice
-
1 teaspoon cornstarch, optional
-
1 tablespoon cold water, if using cornstarch
Fresh raspberries provide a bright, fruity flavor, while frozen raspberries work just as well. There is no need to thaw frozen berries before cooking them.
D. Optional toppings
-
50 g fresh raspberries
-
2 tablespoons Greek yogurt
-
A little powdered sugar
-
White chocolate shavings
-
Fresh mint leaves
These toppings are optional and are not included in the main nutrition estimate.
3. Step-by-step preparation
Step 1: Prepare the baking pan
-
Preheat your oven to 160°C (320°F).
-
Lightly grease a 7-inch springform pan.
-
Line the bottom with baking parchment.
-
Make sure the springform ring is securely fastened.
-
Bring the cream cheese and eggs to room temperature before mixing.
Room-temperature ingredients combine more easily and help prevent lumps in the filling.
If you do not have a springform pan, you can use a deep cake pan lined with parchment paper that extends above the edges, although removing the finished cheesecake will be more difficult.
Step 2: Make the biscuit crust
-
Break the digestive biscuits into small pieces.
-
Place them in a food processor and blend until they form fine crumbs. Alternatively, put them in a sealed bag and crush them with a rolling pin.
-
Transfer the crumbs to a mixing bowl.
-
Add the melted butter and optional honey.
-
Mix until all the crumbs are evenly coated.
-
Take a small amount of the mixture and squeeze it between your fingers. It should hold together when pressed.
-
Transfer the mixture to the prepared pan.
-
Press it firmly into an even layer across the bottom.
-
Use the flat bottom of a glass or measuring cup to compact the crust.
-
Bake for 8–10 minutes.
-
Remove the pan from the oven and let the crust cool.
Important tip: Do not make the crust excessively thick. An even, compact layer gives you a sturdy base without overpowering the cheesecake filling.
If you prefer a crustless version, skip this step and line the pan with parchment paper.
Step 3: Prepare the raspberry sauce
-
Place the raspberries in a small saucepan.
-
Add the sugar and lemon juice.
-
Heat over medium-low heat for approximately 5–8 minutes.
-
Stir gently as the raspberries soften and release their juices.
-
Mash the berries lightly with a spoon.
-
Continue cooking until the mixture becomes thick and concentrated.
If the sauce remains watery, use the optional cornstarch:
-
Mix 1 teaspoon of cornstarch with 1 tablespoon of cold water in a small bowl.
-
Pour the mixture into the simmering raspberry sauce while stirring.
-
Cook for another 30–60 seconds, until the sauce thickens.
-
Remove from the heat and let it cool completely.
For a seedless sauce, press the cooked mixture through a fine-mesh sieve before cooling.
How thick should the sauce be?
It should resemble a loose fruit jam rather than a thin juice. If it is too runny, the raspberry swirl may sink into the filling or spread excessively during baking.
Do not use the sauce while it is hot. Hot sauce can soften the cheesecake mixture and make the swirl difficult to control.
Step 4: Beat the cream cheese
-
Place the softened cream cheese in a large mixing bowl.
-
Beat on low to medium speed for approximately 1–2 minutes.
-
Scrape down the sides and bottom of the bowl.
-
Continue mixing until the cream cheese is smooth and free of visible lumps.
Do not start with cold cream cheese, because it is harder to blend smoothly and may leave small lumps in the finished cheesecake.
Avoid beating at high speed for too long. Excess air can cause the cheesecake to puff up during baking and collapse as it cools.
Step 5: Add the sugar and yogurt
-
Add the granulated sugar to the smooth cream cheese.
-
Mix gently until the sugar is evenly distributed.
-
Add the Greek yogurt.
-
Add the vanilla extract and lemon juice.
-
Add the optional lemon zest.
-
Mix on low speed until the mixture becomes smooth and creamy.
Scrape down the sides of the bowl as needed.
At this stage, the mixture should have a thick, creamy consistency. If your yogurt is particularly watery, strain it through a clean cloth or fine sieve before measuring.
Step 6: Add the protein powder and cornstarch
-
Add the vanilla protein powder gradually.
-
Add the cornstarch.
-
Mix on low speed until the dry ingredients are fully incorporated.
-
Scrape the bowl thoroughly to remove any powder trapped along the sides.
-
Check the texture before adding the eggs.
The mixture should be smooth and thick, without dry pockets of protein powder.
Why mix gently? Protein powder absorbs moisture differently from ordinary flour. Excessive mixing or adding too much powder can make the cheesecake dense, chalky, or rubbery.
If the mixture looks unusually thick because of your particular protein powder, avoid immediately adding extra liquid. Mix thoroughly first and assess its consistency.
Step 7: Add the eggs
-
Crack the first egg into a small bowl.
-
Add it to the cheesecake mixture.
-
Mix gently until just combined.
-
Add the second egg.
-
Mix again on low speed until smooth.
Do not overbeat after adding the eggs.
The eggs help the filling set during baking, while the cream cheese and yogurt contribute creaminess and the protein powder increases the protein content.
Once everything is incorporated, stop mixing.
Step 8: Assemble the cheesecake
-
Check that the biscuit crust has cooled.
-
Pour the cheesecake filling over the crust.
-
Spread the filling evenly using a spatula.
-
Gently tap the pan against the countertop a few times to release large air bubbles.
-
Spoon small drops of the cooled raspberry sauce across the surface.
-
Use a toothpick, skewer, or thin knife to draw gentle curves through the sauce.
For a classic raspberry swirl, draw a few S-shaped lines or figure-eight patterns across the top.
Do not mix the sauce completely into the filling. The aim is to create distinct red ribbons against the pale vanilla mixture.
Reserve a little raspberry sauce for serving if desired.
Step 9: Bake the cheesecake
-
Place the pan on the middle rack of the preheated oven.
-
Bake at 160°C (320°F) for approximately 45–60 minutes.
-
Begin checking at around 40 minutes.
-
Observe the edges: they should look set and slightly firm.
-
Gently move the pan. The center should have a small, soft wobble rather than appearing liquid.
-
Turn off the oven.
-
Leave the cheesecake inside with the door slightly open for 15–20 minutes.
Baking time depends on the oven, pan material, filling depth, and type of protein powder used.
Do not bake until the entire center is completely rigid. The cheesecake continues to set during cooling and refrigeration. Overbaking can make protein-rich cheesecakes dry, crumbly, or rubbery.
For food safety, the egg-containing filling should be fully cooked. If using a food thermometer, check the center and follow an appropriate safe temperature for egg dishes.
Step 10: Cool the cheesecake gradually
-
Remove the cheesecake from the oven after the gradual cooling period.
-
Place the pan on a heat-safe rack.
-
Let it cool at room temperature until it is no longer hot, usually around one hour.
-
Do not leave it at room temperature for more than two hours.
-
Cover the pan and place it in the refrigerator.
Avoid moving the cheesecake directly from a very hot oven into a cold refrigerator. Gradual cooling helps reduce sudden temperature changes that can contribute to cracking.
A small crack does not affect the flavor, and it can easily be covered with fresh raspberries or extra sauce.
Step 11: Refrigerate until fully set
-
Refrigerate the cheesecake for at least 6 hours.
-
For the best consistency, leave it overnight.
-
Once fully chilled, run a thin knife around the inside edge of the pan.
-
Carefully release the springform ring.
-
Place the cheesecake on a serving plate.
Chilling is essential because the filling firms up as it cools. Cutting it too early may result in soft, messy slices.
Step 12: Slice and serve
-
Use a sharp, thin knife.
-
Dip the knife in warm water and wipe it dry before cutting.
-
Cut the cheesecake into 8 equal slices.
-
Clean the knife between cuts for neat edges.
-
Add fresh raspberries, a little reserved raspberry sauce, or a spoonful of Greek yogurt.
For the best flavor, let each slice stand for approximately 5–10 minutes after removing it from the refrigerator. Keep the remaining cheesecake chilled.
4. Estimated nutritional information
The following figures are approximate for one slice when the cheesecake is divided into 8 portions, using full-fat cream cheese, Greek yogurt, vanilla whey protein, regular sugar, and the biscuit crust.
| Nutrient | Approximate amount per slice |
|---|---|
| Calories | 300–340 kcal |
| Protein | 16–20 g |
| Carbohydrates | 25–32 g |
| Fat | 15–19 g |
| Sugar | 14–20 g |
Actual values depend on the brands and quantities used. Protein powder labels vary considerably, so calculate the nutrition from your specific ingredients if you need accurate tracking.
How to increase the protein content
-
Choose a protein powder with a higher protein percentage.
-
Use a high-protein, thick Greek yogurt.
-
Replace a portion of the cream cheese with strained cottage cheese blended until completely smooth.
-
Make 10 smaller portions instead of 8 to reduce the calories per serving, although this does not change the nutrition of the whole cheesecake.
Changing the proportions of cream cheese and yogurt can alter the texture, so avoid making large substitutions without adjusting the recipe.
5. How to make it lighter
If you want a lighter version, consider these modifications:
-
Replace some of the full-fat cream cheese with reduced-fat cream cheese.
-
Use nonfat Greek yogurt.
-
Reduce the amount of butter in the crust slightly, provided the crumbs still hold together.
-
Use a suitable baking sweetener in place of some or all of the sugar, following the manufacturer’s conversion guidance.
-
Skip optional toppings.
Keep in mind that reduced-fat ingredients and some sweeteners can change the texture and flavor. The result may be less rich than the standard recipe.
6. Common mistakes and solutions
| Problem | Likely cause | How to fix it |
|---|---|---|
| Lumpy filling | Cream cheese was too cold | Bring ingredients to room temperature and beat the cream cheese first |
| Cheesecake cracks | Excess air, rapid cooling, or overbaking | Mix gently and cool gradually |
| Filling is too soft | Insufficient chilling or excess moisture | Refrigerate longer and use thick Greek yogurt |
| Texture is rubbery | Too much protein powder or overbaking | Measure the powder accurately and avoid excessive baking |
| Raspberry sauce sinks | Sauce was too thin or warm | Cook until thick and cool completely |
| Crust crumbles | Insufficient butter or poor compression | Mix thoroughly and press firmly into the pan |
| Cheesecake tastes chalky | Protein powder flavor or quantity | Use a good-quality vanilla protein powder and measure carefully |
| Center remains liquid | Underbaking | Continue baking in short intervals until the center is properly set |
7. Storage instructions
Refrigerator
Store the cheesecake in an airtight container or cover it securely. Keep refrigerated and consume within 3–4 days.
Freezer
-
Chill the cheesecake completely.
-
Cut it into individual slices.
-
Wrap each slice securely.
-
Place the wrapped slices in a freezer-safe container.
-
Freeze for up to 2 months for best quality.
Thawing
Transfer a frozen slice to the refrigerator and allow it to thaw overnight or until completely thawed. Avoid repeatedly freezing and thawing the cheesecake.
Because this recipe contains dairy and eggs, keep it refrigerated when not serving.
8. Make-ahead instructions
This cheesecake is ideal for preparing one day before serving.
The day before:
-
Prepare the biscuit crust.
-
Cook the raspberry sauce and allow it to cool.
-
Mix the filling and assemble the cheesecake.
-
Bake and cool it gradually.
-
Refrigerate overnight.
On serving day:
-
Release the springform pan.
-
Slice the cheesecake.
-
Add fresh raspberries or reserved sauce.
-
Serve chilled.
Preparing it in advance allows the filling to become firm and the vanilla and raspberry flavors to blend.
9. Final result
The finished Raspberry Swirl Protein Cheesecake should have:
-
A firm, buttery biscuit crust.
-
A smooth, creamy vanilla filling.
-
A balanced sweet-and-tangy raspberry flavor.
-
Attractive raspberry ribbons throughout the surface.
-
A chilled, sliceable texture without excessive dryness.
Best tip: Use thick Greek yogurt, measure the protein powder accurately, avoid overmixing, and refrigerate the cheesecake overnight. These four steps make the biggest difference to the final texture and flavor.
